Step 3 - Cooling the Eggs and Peeling
Now the fun begins. The eggs must first be cooled before
they can be peeled. The key here is to cool the eggs quickly.
Why? It is the best way to prevent that greenish ring from
forming around the yolk. The green color results from the
chemical reaction of iron in the egg yolk with sulfur found
in the egg white. When an egg is heated, these two combine
to make greeny-gray ferrous sulfide and smelly hydrogen sulfide
gas.
Rapidly cooling the eggs minimizes this natural chemical
reaction.
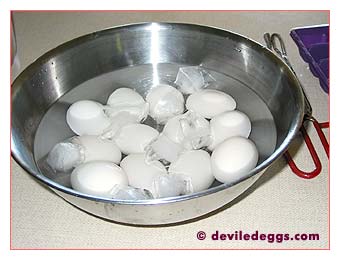 The
best way to cool the eggs is by placing them in a bowl of
ice water. Personally, I have a separate bowl ready and just
pluck the eggs out of the pot of boiling water with tongs
and add them to the ice water bowl. Some folks I know just
drain the hot water off the pot, add some cold water and toss
some ice cubes in there too. Either way, you should obtain
the same result. Leave the eggs to cool for about 20 minutes.
This should be enough time for them to be ready for the fun
part ..... peeling! The
best way to cool the eggs is by placing them in a bowl of
ice water. Personally, I have a separate bowl ready and just
pluck the eggs out of the pot of boiling water with tongs
and add them to the ice water bowl. Some folks I know just
drain the hot water off the pot, add some cold water and toss
some ice cubes in there too. Either way, you should obtain
the same result. Leave the eggs to cool for about 20 minutes.
This should be enough time for them to be ready for the fun
part ..... peeling!
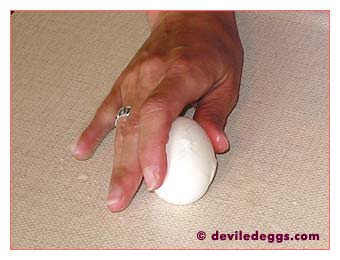 So,
let me share how I peel eggs. You may find this technique
makes your egg-peeling experiences easier. First off, take
the egg and give it a few gentle taps on a hard surface. Here
you can see I'm just using the kitchen counter. If you tap
too hard, you can accidentally smack the whole egg in half,
so be careful. Gently, keep tapping the egg until the shell
is fractured-looking all over. The shell will look very broken
but you will start to see a whitish membrane underneath still
holding the shell in place. So,
let me share how I peel eggs. You may find this technique
makes your egg-peeling experiences easier. First off, take
the egg and give it a few gentle taps on a hard surface. Here
you can see I'm just using the kitchen counter. If you tap
too hard, you can accidentally smack the whole egg in half,
so be careful. Gently, keep tapping the egg until the shell
is fractured-looking all over. The shell will look very broken
but you will start to see a whitish membrane underneath still
holding the shell in place.
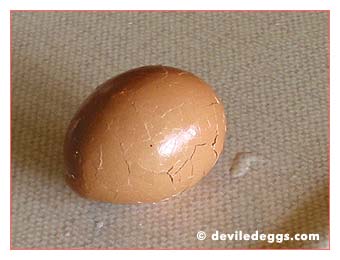
Here's a brown egg to show how much the shell
is cracked:
Next, place the cracked egg back into your cooling
water. Allow the egg to sit for an additional 10 minutes or
so. This will let some water seep under the shells to aid
peeling. Add the eggs back to the water when you're finished
with each one, and by the time you've cracked them all, you
can get back to starting to peel the first one you cracked.
 Now,
take the egg at this point and roll it between your palms.
The shell and the membrane may even slip off easily at this
point. If the shell is a bit stubborn however, it often helps
to do this part under cold running water from the tap. Hold
the egg in your hands under the running water while you ease
the shell off. You may need to gently start the process off
by picking a small bit of shell off with your fingernail.
Then the egg shells should slip off perfectly. You will be
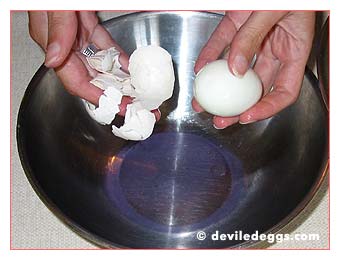
rewarded with a plateful of perfectly round, smooth eggs! Now,
take the egg at this point and roll it between your palms.
The shell and the membrane may even slip off easily at this
point. If the shell is a bit stubborn however, it often helps
to do this part under cold running water from the tap. Hold
the egg in your hands under the running water while you ease
the shell off. You may need to gently start the process off
by picking a small bit of shell off with your fingernail.
Then the egg shells should slip off perfectly. You will be
rewarded with a plateful of perfectly round, smooth eggs!
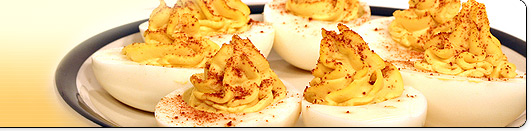
 Finally! We're ready to start making
the deviled egg filling!
Finally! We're ready to start making
the deviled egg filling!
|