Step 4 - Slicing and Removing the Egg Yolks
Now that you have finished peeling your eggs, give each egg
a rinse in cold water to make sure there are no little shell-bits
left on them. Nothing is worse than getting a crunchy shell
bit in a nice smooth deviled egg filling!
Remember, it is typical for at least one egg to be stubborn
during the peeling process, so this is why I cook a couple
more eggs than I need for a deviled egg recipe!
Here below we have a perfect plate of peeled hard-boiled
eggs.
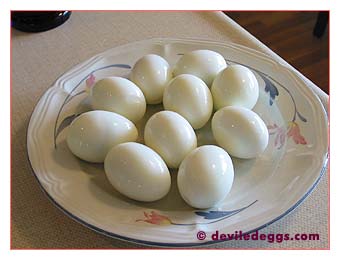 Now,
you may have noticed that I started with 12 eggs but have
only 10 left. Of the two that didn't make it, one cracked
in the pot during cooking, and the other split in half when
I was trying to peel it. Now,
you may have noticed that I started with 12 eggs but have
only 10 left. Of the two that didn't make it, one cracked
in the pot during cooking, and the other split in half when
I was trying to peel it.
This is common and don't feel bad if the same thing happens
to you. These "less than perfect" eggs are still
edible of course, just not good candidates for deviled eggs.
You can make a mini egg salad, or slice them up on a green
salad for lunch.
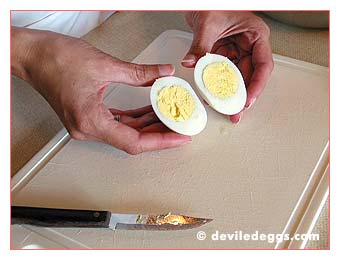 If
you're in a hurry, you can start slicing the eggs immediately,
but I find it's good to let the freshly peeled eggs cool in
the refrigerator for 30 minutes. I think it makes the egg
white a little firmer and helps them slice smoothly. Once
they're cool, using a knife with a clean (not serrated) edge
(a paring knife is effective), cut cleanly through the center
of each egg. (Here you can see that the yolk is centered and
there's barely any green ring at all.) Slice the eggs and
return the halves (officially called shells now) to your plate. If
you're in a hurry, you can start slicing the eggs immediately,
but I find it's good to let the freshly peeled eggs cool in
the refrigerator for 30 minutes. I think it makes the egg
white a little firmer and helps them slice smoothly. Once
they're cool, using a knife with a clean (not serrated) edge
(a paring knife is effective), cut cleanly through the center
of each egg. (Here you can see that the yolk is centered and
there's barely any green ring at all.) Slice the eggs and
return the halves (officially called shells now) to your plate.
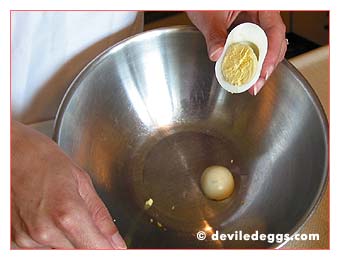 Next,
with a gentle but firm pressure, give each egg half a squeeze
from either side. The yolk will usually pop out easily. You
can also take a small spoon to ease the yolk out if the egg
sides appear particularly thin or fragile. You'll get a feel
for how much pressure is necessary and when you'll need a
little help with the spoon. Most should pop out like this
one in the picture though! Next,
with a gentle but firm pressure, give each egg half a squeeze
from either side. The yolk will usually pop out easily. You
can also take a small spoon to ease the yolk out if the egg
sides appear particularly thin or fragile. You'll get a feel
for how much pressure is necessary and when you'll need a
little help with the spoon. Most should pop out like this
one in the picture though!
Next, choose a recipe
from my site that suits your mood or purpose. And then we
move forward to .....
 Making the filling!
Step 5
Making the filling!
Step 5
|